Home › Minecraft › How to Make a Smithing Table in Minecraft
How to Make a Smithing Table in Minecraft
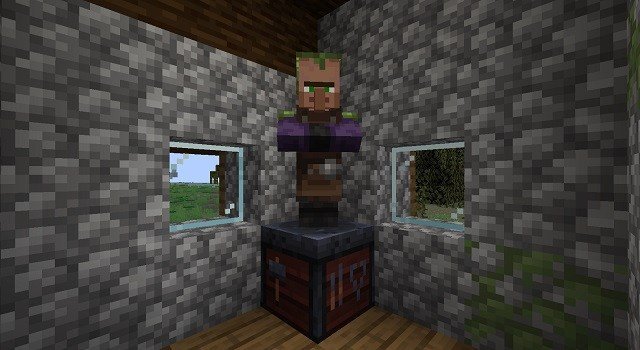
Every other workstation in Minecraft either crafts, smelts or enchants. The smithing table does something more specific and more valuable: it is the single block standing between your diamond gear and the netherite tier, the strongest equipment in the game. It is cheap enough to build on your first day, even if you will not unlock its full potential until much later.
What You Need to Make a Smithing Table
- 2 iron ingots — smelted from raw iron
- 4 wooden planks — any type, and they do not need to match
- A crafting table
That is the entire list. Iron is common in caves and hillsides from early on, and planks come from the nearest tree, so there is no excuse for putting this craft off.
The Smithing Table Crafting Recipe
- Open a crafting table.
- Place the two iron ingots side by side in two adjacent slots of the top row.
- Fill the four slots in the two rows directly beneath the ingots with planks.
- Collect the smithing table from the result slot.
You can also skip crafting entirely: smithing tables generate inside toolsmith huts in villages, because the block doubles as the toolsmith's job site. An unemployed villager who can reach one will claim it and become a toolsmith. If you find one in a village, it breaks quickly with a pickaxe — or even by hand — and drops itself for you to take home.
Upgrading Diamond Gear to Netherite
Open the smithing table and you will see three input slots: one for a template, one for the piece of gear, and one for a material. To upgrade, you need all three of the following:
- A netherite upgrade smithing template, found in the treasure rooms of bastion remnants in the Nether
- The diamond item you want to upgrade — sword, pickaxe, helmet, anything diamond
- One netherite ingot
The result is the same item in netherite form, and this is where the smithing table outshines the anvil: upgrading costs no experience levels at all, and the gear keeps every enchantment and all of its remaining durability. Templates are precious, so duplicate yours before using it — combine a template with seven diamonds and one netherrack on a crafting table to make a copy. Each upgrade only ever needs a single netherite ingot, regardless of whether you are upgrading a shovel or a chestplate.
Applying Armour Trims
The table's second job is pure style. Armour trim templates hide in chests across the world's structures — shipwrecks, End cities, ancient cities, jungle temples and more — and each carries the pattern of the place it came from. Put a trim template in the first slot, a piece of armour in the second, and a material in the third, and the armour gains that pattern in the material's colour. Ten materials work, from iron and copper through gold, emerald, diamond and netherite, so a single trim design can look completely different depending on what you pair it with. Trims are cosmetic only, but on a busy server they are how geared-up players tell each other apart.
One limit worth knowing: the smithing table only works on diamond gear for upgrades. Iron, gold and chainmail items cannot be turned into netherite — diamond is the mandatory starting point, which makes your diamond set worth enchanting and looking after even once you start dreaming in dark grey.
Frequently asked questions
How many iron ingots do you need for a smithing table?
Two iron ingots, placed side by side in the top row of a crafting table, with four planks of any wood filling the two rows beneath them.
What do you need to upgrade diamond gear to netherite?
Three things in the smithing table: a netherite upgrade template from a bastion remnant, the diamond item, and one netherite ingot. The upgrade costs no XP and keeps all enchantments.
Can you upgrade iron or gold gear to netherite?
No. Only diamond gear can be upgraded at a smithing table, so you always need the diamond version of an item first.
Where do smithing tables generate naturally?
Inside toolsmith huts in villages. The block is the toolsmith villager's job site, and you can break one and take it with you.
More Minecraft guides
 All Minecraft Villager Jobs ExplainedUpdated 12 November 2026
 Woodland Mansion in Minecraft: How to Find and Loot OneUpdated 12 November 2026
 Mineshafts in Minecraft: Loot, Cave Spiders and How to Find OneUpdated 12 November 2026
 Redstone Components in Minecraft: A Complete GuideUpdated 12 November 2026
 All Wolf Variants in Minecraft and Where to Find ThemUpdated 12 November 2026