Home › Minecraft › How to Install Minecraft Mods: CurseForge App and Manual Methods
How to Install Minecraft Mods: CurseForge App and Manual Methods
Mods are where Minecraft stops being one game and becomes hundreds. New dimensions, machines, magic systems, performance boosts: all of it arrives as small files made by the community. Installing them sounds technical, but there are really only two routes, an app that does everything for you, or a manual method with about four steps. First, one safety rule that matters more than any other here: back up your worlds before modding them, and only download mods from established sites like CurseForge and Modrinth.
Method 1: The CurseForge App
The CurseForge app manages versions, loaders and dependencies automatically, which makes it the right choice for your first modded setup.
- Open the app and click Minecraft on the home screen. Choose the Standard folder option and continue.
- Click Create Custom Profile. Name it, pick your Minecraft version, and set the game type to the loader your mods need: Forge, NeoForge or Fabric. Use the latest loader version offered.
- Open the new profile from the My Modpacks section and click Add More Content.
- Search for a mod and click Install. It appears under the profile's Mods list, where you can disable it without deleting it.
- Press Play on the profile. CurseForge opens your normal launcher with a new modded installation; select it, tick the "I understand the risks" box if it appears, and launch.
Profiles are independent, so you can keep a 1.21 performance setup and an older modpack side by side. Just remember that deleting a profile deletes its worlds too, which is another reason that backup matters.
Method 2: Manual Install with a Mod Loader
The manual route gives you full control and works with any loader. Install your loader first (NeoForge, Forge and Fabric each have their own installers), then:
- Find your mod on CurseForge or Modrinth and open its files. Choose the build that matches both your Minecraft version and your loader; the download pages make you confirm both.
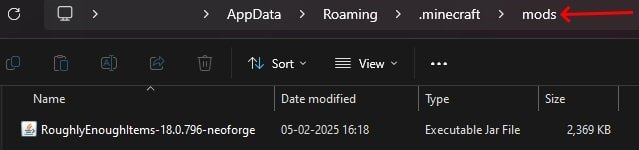
- Open your game folder by typing %appdata%\.minecraft into the Windows Run box.
- Open the mods folder, creating it if it does not exist, and move the downloaded jar inside.
- Launch the game with the loader's profile selected.
Multiple jars can share the mods folder, but every one of them must target the same game version and loader. A mismatch is the number one cause of crashes, and the error screen normally names the offending file.
Alternatives Worth Knowing
Modrinth also has its own launcher that installs mods and modpacks with dependency handling built in, and Prism Launcher is a favourite for juggling many separate instances cleanly. Both follow the same logic as CurseForge: pick a version, pick a loader, let the tool fetch matching files.
Whichever route you take, the golden rules never change: match the version, match the loader, download from trusted libraries, and keep a backup. Do that, and modding is genuinely a ten-minute job.
Once the first mod works, a good habit is to add new ones a few at a time rather than dumping thirty jars in at once. If the game then fails to start, you know the culprit is in the latest handful instead of the whole pile. Keep the original downloaded files in a folder outside the game directory as well; rebuilding a mod setup after a reinstall or a version jump takes minutes when you can see exactly what you had.
Frequently asked questions
Where is the Minecraft mods folder?
Inside the main .minecraft folder, which on Windows sits in AppData/Roaming. If no mods folder exists, create one and name it exactly mods.
Are mods from CurseForge safe?
Mostly, but it is a huge library. Stick to popular, heavily downloaded mods from CurseForge or Modrinth and avoid random download sites entirely.
Do mods work on Bedrock Edition?
Not these mods. Java-style mods need a loader on Java Edition. Bedrock uses add-ons from the Marketplace or community files instead.
Why does my game crash after adding a mod?
Almost always a version or loader mismatch, or a missing dependency. Check that every jar matches your Minecraft version and loader exactly.
More Minecraft guides
 Redstone Components in Minecraft: A Complete GuideUpdated 12 November 2026
 Respiration Enchantment in Minecraft: Breathe Longer UnderwaterUpdated 12 November 2026
 What Does Smite Do in Minecraft? Smite Enchantment GuideUpdated 12 November 2026
 What Do Horses Eat in Minecraft? Every Food and Its EffectsUpdated 12 November 2026
 All Wolf Variants in Minecraft and Where to Find ThemUpdated 12 November 2026