Home › Minecraft › How to Dye Bundles in Minecraft
How to Dye Bundles in Minecraft
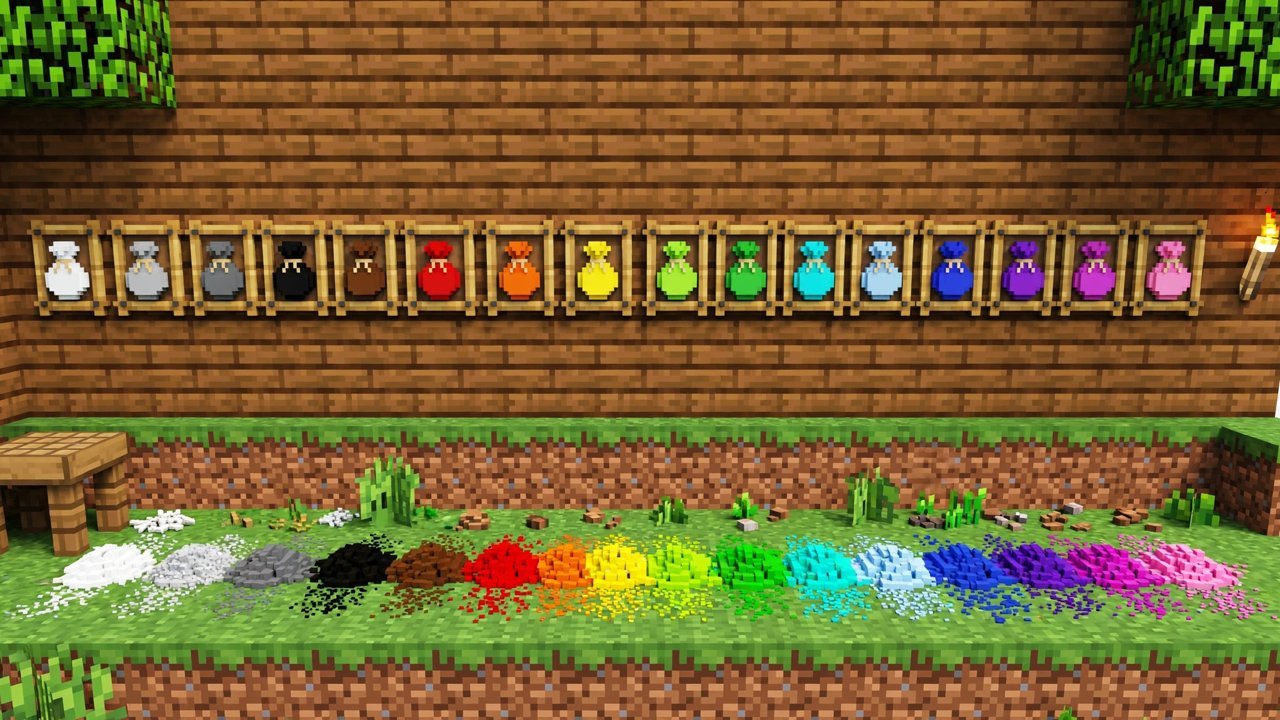
A bundle holds a mixed stack of items in a single inventory slot, which makes it brilliant for exploration kits and terrible for finding anything. Colour fixes that. A dyed bundle is recognisable at a glance, and once you assign colours meanings, your whole inventory becomes readable without opening a thing.
What You Need
- 1 bundle — crafted from leather and string
- 1 dye — any of the 16 standard colours
- No crafting table required: the 2x2 grid in your inventory is big enough
How to Dye a Bundle
- Place the bundle in any slot of the crafting grid.
- Place the dye in any other slot.
- Take the coloured bundle from the result slot.
One dye colours one bundle, and the shade is the exact, flat colour of the dye you used. Changed your mind? Put the coloured bundle back in the grid with a different dye and it simply takes the new colour — there is no undyeing step and no wasted material beyond the extra dye.
All 16 Colours, No Mixing
Bundles accept every standard dye colour: white, light gray, gray, black, brown, red, orange, yellow, lime, green, cyan, light blue, blue, purple, magenta and pink. What they do not do is mix. Leather armour can be blended to millions of in-between shades in a cauldron; bundles stick to the 16 true colours. That limitation is secretly a feature — a red bundle looks identical in every world, on every screen, so a colour code never gets ambiguous.
Building a Colour Code
The real value of dyed bundles is the system you build on top of them. A setup that works well:
- Red — emergency kit: food, torches, a bed, spare tools
- Green — farming and seeds
- Blue — ocean and fishing supplies
- Yellow — ores and valuable finds while caving
- Purple — potions and brewing ingredients
- Black — redstone components
On multiplayer servers the same trick becomes team logistics: colour-match bundles to roles, and restocking a teammate is as simple as throwing them the right colour. Adventure map makers use dyed bundles as quest-item containers for the same reason — the colour communicates before the item is even opened.
Small Tips
- Dye bundles before a big trip, not during — sorting in a cave with a full inventory is how items get left behind.
- Keep one undyed bundle as your misc sack, so the colour system stays meaningful.
- Pair colours with names: a renamed, dyed bundle (anvil plus a few levels) is unmistakable in a crowded chest room.
- Dye is cheap. If a colour stops making sense, re-dye rather than working around it.
- Match bundle colours to the shulker box colours you already use, and nested storage stays consistent from chest to inventory.
- Prep one dyed bundle per biome before an expedition — a snow kit, a desert kit, a Nether kit — and swap them at base instead of re-sorting gear every trip.
It takes ten seconds and one flower's worth of dye, but colour-coded bundles quietly remove one of survival mode's constant frictions — digging through identical pouches while something creeps up behind you.
Frequently asked questions
How do you dye a bundle in Minecraft?
Place the bundle and one dye together in a crafting grid — the 2x2 grid in your inventory works — and take the coloured bundle from the result slot.
Can you change a bundle's colour after dyeing it?
Yes. Combine the coloured bundle with a different dye in the grid and it takes the new colour. There is no need to remove the old colour first.
How many colours can bundles be dyed?
All 16 standard dye colours. Unlike leather armour, bundles cannot be mixed into custom shades — each dye gives its exact flat colour.
Does dyeing a bundle cost more than one dye?
No. A single dye colours a whole bundle, and re-dyeing to a new colour costs just one more dye.
More Minecraft guides
 What Do Horses Eat in Minecraft? Every Food and Its EffectsUpdated 12 November 2026
 When Did Minecraft Come Out? Full Release TimelineUpdated 12 November 2026
 6 Best Uses of Wind Charge in MinecraftUpdated 12 November 2026
 6 Best Uses of Wither Roses in MinecraftUpdated 12 November 2026
 All Wolf Variants in Minecraft and Where to Find ThemUpdated 12 November 2026